Google Sheets named ranges can be used to define a cell or a range of cells and give it a name. Now, instead of using the cell references, you can use the name of the named range in calculations.
For example, suppose I have sales transaction data for a store, and I need to calculate metrics such as the sum of all the sales, count of sales of item A, average sale value, and maximum/minimum sale value.
Instead of using the cell references of the range that has the sales data, I can create a named range (with a descriptive name such as ‘SalesData’) and use this name instead.
This Article Covers:
What are Google Sheets Named Ranges?
A named range is a name that refers to a cell range of specific values or formula results. It is usually assigned by the user to avoid hard-coding the values manually. They can be created either in the text box or in the format menu.
Why Use Named Ranges in Google Sheets
There are a lot of benefits to using a Google Sheet named range. One of these advantages is the ease of navigation. You can use named ranges to navigate your spreadsheet simply by clicking on the named range you want. This is especially useful if you are working with something like a dashboard.
Named ranges are also easier to use when working with formulas. If you have a long range of data, instead of hard coding the range you can simply name it and use it in the formula. For example, =AVERAGE(SalesData) is easier than =AVERAGE(B2:B21)
It is also useful when you need to work with the same range for multiple different functions and formulas. Instead of hard-coding the range in each formula, you can use the named range instead to make work easier.
You can update a named range, and all the formulas using it will now refer to the new range. This is a big time saver.
Creating a Named Range in Google Sheets
Suppose I have a sales transaction data as shown below, and I want to create a named range for the sales data:

Here are the steps to create a named range in Google Sheets:
Step 1: Select the data you want to create a named range.
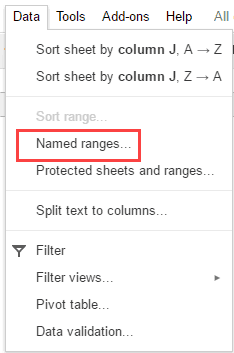
Step 2: Go to the Data Tab.

Step 3: Click on Named Ranges from the drop down.

Step 4: In the Named ranges pane, enter the name in the first field box. In this example, we are using the name SalesData.
Step 5: Make sure the right cell range is listed in the second field box. If incorrect, change it.
Step 6: Click on Done.

This will create the Named Range – SalesData.
Once created, you can use the named range in formulas. Here are some examples where you can use the SalesData named range:
- To get the sum of all the sales: =SUM(SalesData)
- To find the average sales value: =AVERAGE(SalesData)
- To find the maximum sales value: =MAX(SalesData)
How to Name a Range in Google Sheets Using Keyboard Shortcut
A faster way to create named ranges is by using the keyboard shortcut Ctrl+J. Here’s how to name a range in Google Sheets:
Step 1: Select the range

Step 2: Press the Keyboard shortcut Ctrl+J

Step 3: Type the name you want to use for the named range

Step 4: Press Enter
You now have a named range in Google Sheets.
Naming Rules While Creating Named Ranges in Google Sheets
There are some rules you need to follow while creating named ranges in Google Sheets.
A named range:
- Can’t contain any spaces or punctuation. For example, you can not have ‘Sales Data’. However, you can use underscores between words. Hence ‘Sales_Data’ is fine.
- Can contain only letters, numbers, and underscores.
- Can’t start with a number, or the words “true” or “false.”
- Must not be more than 250 characters long.
- Can’t be something that refers to a range. For example, you can not name it A1, as it already refers to a cell. Similarly, you can not name it A1:A100.
Editing a Named Range
Once a Named Range is created, you may want to change it or update it.
For example, if you have a named range that refers to the sales data, and you have three new transactions that need to be added to the data, you would have to update the named range to include these three additional data points.
Here are the steps to update/edit a named range in Google Sheets:
Step 1: Go to the Data Tab.
Step 2: Click on Named Ranges.
Step 3: Hover the mouse on the Named range that you want to edit and click on the Edit icon.
Step 4: Update the Name or the Range.
Step 5: Click on Done.
How to Use Named Ranges in Google Sheets
One of the benefits of a named range is that they are easy to use with formulas. They can be used with any formula that uses a range such as SUM, COUNT, AVERAGE, and other functions.
For example, if we wanted to find the sum of the total sales in our sheet below and
we already have our named range as “Sales” so the formula would be =SUM(Sales)

You can also use named ranges to create a drop down list in a cell. All you need to do is:
- Select the cell where the drop down will be.
- Go to Data > Data validation
- In the criteria, menu make sure it is on the list from a range, then type in the named range in the range section and press Save.

The drop down menu will display the values in the named range as below:

Creating a Dynamic Named Range in Google Sheets
Named Ranges are great as it allows you to update the named range once and all the formulas using that named range automatically update.
However, doing this manually may seem tedious if you have to frequently update the data or if you have too many named ranges.
While in Excel, it’s possible to create a named range using the OFFSET or INDIRECT formula, it doesn’t work in Google Sheets.
However, you can do that using a neat INDIRECT function trick.
Suppose you have a dataset as shown below and you want to create a named range for the sales data in a way that whenever new data is added, the named range automatically updates.
Here are the steps to create a Google Sheet dynamic range name:
Step 1: In a cell (E2 in this example) enter the formula =COUNT(C2:C100)+1. This will give us the number of cells that have a number in it. 1 is added to the formula as our sales data starts from row number 2. Also note that we have used C2:C100 so that if data is added in future, it will automatically be counted. Also, we have used COUNT function as the data is all numeric. Based on your data, you can use COUNTIF as well.

Step 2: In another cell (F2 in this example), enter the formula =”Sheet1!C2:C”&E2. This would give us a reference that would cover the entire sales data column. For example, if there are 10 sales transactions, it would give Sheet1!C2:C11. If there are 15 transactions, it will give Sheet1!C2:C16

Step 3: Go to the Data tab and select Named Ranges.
Step 4: Create a named range with the name SalesData and use Sheet1!F2 as the range.

Now, you can use the following formula to refer to the dynamic named range: =INDIRECT(SalesData).
The INDIRECT function would use the named range and refer to cell F2, which in turn has the reference for the sales data. Since we have made the range in F2 dynamic (by using =”Sheet1!C2:C”&E2), the named range also becomes dynamic.
For example, if you now want to calculate the sum of sales, you can use the formula =SUM(INDIRECT(SalesData)). If more transaction records are added, the formula would automatically update and give you the new sum of sales.
Using Scripts with a Named Range In Google Sheets
Named ranges are convenient to use in Google Apps Script as well. There are functions that require getting the cell ranges from the data source. In this case, we would use named ranges. We can also create and modify named ranges with the following:
- getName()– returns the name of the specified named range.
- getRange()– returns the range referenced by the specified named range.
- remove()– removes the specified named range.
- setName(name)– Sets/updates the name of the specified named range.
- setRange(range)– Sets/updates the range for the specified named range.
Using Named Ranges with Custom Functions in Google Sheets.
Custom formulas can be created in Google Sheets using the App scripts. For example, you can create a custom function that can double the values in your data range.
We can create the function DOUBLE using the following script:
function DOUBLE(input) {
return input * 2;
}

However, that’s not all. If you try to use this formula with your named range, you will get a NUM error. In order for your custom function to be able to work with ranges, you need to make it return a 2d array.
To do that, you will need to modify your script with an array as follows:
function DOUBLE(input) {
return Array.isArray(input) ?
input.map(row => row.map(cell => cell * 2)) :
input * 2;
}

Once you have pasted the script, save it then click Run. If you go back to your sheets, you can now use the custom function as an in-built function in Google Sheets. To use it with a name range, just type the equal sign and then the name of the custom function. In our case, the name is DOUBLE.

Type in the name of the named range in the brackets. Google Sheets will suggest the available named ranges that you can choose from. Once you hit Enter the formula will return the results for the range in the entire column.

Frequently Asked Questions
Does Google Sheets Support Named Ranges?
Yes, Google Sheets does have named ranges which let you group multiple data ranges in one sheet for different purposes.
How Do You Reference a Named Range in Another Sheet in Google Sheets?
To reference a named range in another sheet in Google Sheet first you need to locate the sheet and sheet name where the named range can be found.
Then you will use the sheet name and an exclamation (!) before the name range as the reference.
For example if we were to find the SUM of the named range in our first sheet in a new sheet, we would use the formula =SUM(Sheet1!Sales)
It is not really necessary to add the sheet name in the formula, though.
Type this formula into the new sheet.

If you click Enter the sum for the values in the named range will appear in your new sheet.

If you get a NAME ERROR that states an unknown range name and Google Sheets was unable to find the range, in which case you should check your spelling and whether the named range is still there.
What is the Disadvantage of Using Named Ranges?
There are a few disadvantages to using Google Sheets named ranges, including:
- They may get lost in translation in case you are using different languages
- When creating a number of them, you will need to come up with a variety of names.
- Small typos can cause errors in calculations
- You need to be able to remember the names
Do Named Ranges Slow Down Google Sheets?
Yes, especially when you have large data and you are using formulas. If your range has entire columns instead of a defined range, Google Sheet named ranges will slow down the spreadsheet when calculating since it will figure everything in the range, even empty cells.
Conclusion
Google Sheets named ranges are a pretty handy function. In this article we showed you how to name a range in Google Sheets and how to use named ranges in Google Sheets.
Want to become a Google Sheets expert? We highly recommend checking out Udemy’s Google Sheets Comprehensive Masterclass and the Complete Google Sheets Course.
You May Also Like the Following Google Sheets Tutorials:
- How to Create a Drop Down List in Google Sheets
- How to Insert Checkbox in Google Sheets
- Using Query Function in Google Sheets.
- How to Use IMPORTDATA function in Google Sheets.
- Using IMPORTFEED in Google Sheets to Fetch Feed from URL.
- The Ultimate Guide to Google Sheets VLOOKUP Function.
- Using IFERROR Function in Google Sheets.
- How to VLOOKUP in Another Sheet in Google Sheets
Thanks, your post has helped me to make a dynamic named range in Google Sheet. However, if I understand correctly, if I move the Sales Value to another position, the value in E2 and F2 will be invalid.
Can I do something about that?