Let’s talk about Google Sheets Goal Seek. It’s a valuable tool and one that doesn’t get enough attention. In this article, I will show you how to use Goal Seek.
As always, expect practical examples and a full breakdown of the function. By the end, you should be completely familiar with Goal Seek in Google Sheets.
This Article Covers:
What is Goal Seek?
Goal seek is a powerful data analysis utility provided by Google Sheets. It’s basically an algorithm that lets you feed the output you want to achieve and then gives you the value of a given input variable that will help provide the given output.
The Goal Seek algorithm essentially performs a series of what-if calculations by gradually plugging in different input values until you get your required output. You can use these in a business plan template to show forecasting or annual goals.
As an example, picture you’re doing data analysis for your business. You might know your annual sales, your inventory, and your pricing structures. You might also want to know exactly how much you want to make next year. Consider that next year’s goal.
But how do you get there?
That’s where you’ll use Goal Seek in Google Sheets.
In this situation, it would help you determine how many units you’d need to produce or sell in order to reach your target. I’ll show you how to do it with the ‘Goal Seek’ option of Google Sheets.
Ready to get started? Below, I explain what Goal Seek does, how it works, a step-by-step example, and how to install it as a Google Sheets add-on. Most importantly, I’ll share my experience with how to use it.
Goal Seek in Google Sheets: An Example
For example, a common application of the algorithm is to find out how many units of sales are required to break even, given other fixed variables, like production cost, profit, net present value, etc.
A Goal Seek algorithm consists of three components:
- An unknown input variable
- A known output value
- A formula involving the unknown input to get to the known output
You know how much I like to discuss the syntax of formulas in Google Sheets. This is the closest thing I can provide for the Goal Seek add-on. After all, these are the pieces of information you need to make it work.
How to Use Goal-Seek in Google Sheets
I love to use Google Sheets Goal Seek. It’s relevant for so many tasks. For simplicity and to help you understand the main idea behind goal seek, consider my very simple example. I’m including the unit prices of a few products along with the number of units sold. The last column consists of the total sales of each product, while cell D7 contains the Grand total of all the sales.
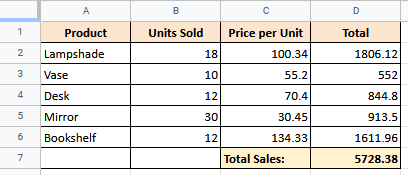
Let’s say I want to change the Grand total from $5,728.38 to $7,000 using Goal Seek, and I want to know how many units of Lamps will help me get that. That’s basic forecasting and goal-setting. It’s also fundamental for every business. So how do I use Goal Seek to make it happen?
Follow along for my step-by-step guide. It shows how to set up and use Goal Seek to solve this problem.
Adding the Goal Seek Add-on to Google Sheets
Unfortunately, the Goal Seek function does not come as a menu item of Google Sheets by default. That makes it different from the ability to highlight duplicates, for example. However, it is available as an official add-on, and you can install it for free from the Google Workspace Marketplace. It’s one of those super-useful features that takes just a few extra seconds to access. Here’s how.
Choose the Goal seek add-on to your Google Sheets menu (as pictured in my screenshot here):
- From the ‘Add-ons’ menu, select ‘Get add-ons’.

- This will open Google Workspace Marketplace, from where you can find the apps you need.
- In the search bar on top, type ‘Goal seek’.

- Select the Goal Seek App from the app options that appear.

- Click on the Install button.

- You will be asked for permission to install Goal Seek. Click Continue.

- You will then be asked to confirm if you want to allow Goal Seek to access your Google account. Click Allow.

- You should now see a message that says ‘Goal Seek has been installed’. Click Done.

- Close the Google Workspace Marketplace window.


You should now see the Goal Seek add-on added as a menu item under the ‘add-ons’ menu.
Opening the Goal Seek Window
To open the Goal Seek window from the add-on menu, follow the steps below:
- From the Add-ons menu, navigate to Add-ons -> Goal Seek -> Open.

- Wait for the Goal seek window to open.
- Once the app is loaded you should be able to see the Goal seek window as a sidebar panel of your Google Sheets window.


Setting up the Goal Seek Options
After your Goal Seek window opens, you can simply plug in your required values and let it work its magic.
For our particular sample problem, here are the settings you can enter:
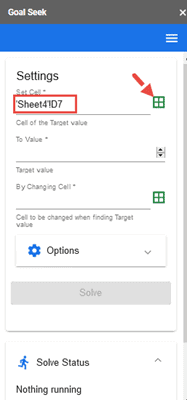
Set Cell
There are two ways to provide this input. One way is to directly type the cell reference of the cell containing the known output value (D7).
Another way is to select cell D7 and then click on the ‘Capture selected cell’ button under the ‘Set Cell’ field of the Goal Seek pane.
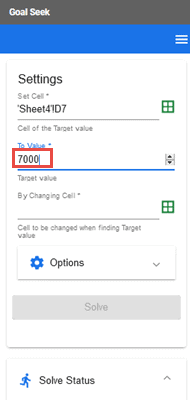
To Value
Under ‘To Value’, type your target value (7000 in our case). Make sure you don’t include any currency signs or separators.
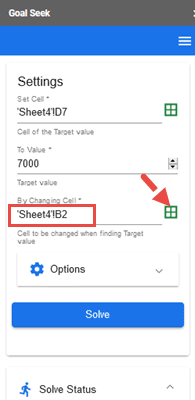
By Changing Cell
Here, you need to provide the cell reference for the cell containing the unknown value (Number of lampshade units that need to be sold, which is cell B2).
Similar to the Set cell value, you can provide this reference in two ways. One way is to directly type the cell reference (B2).
Another way is to select cell B2 and then click on the ‘Capture selected cell’ button under the ‘By changing cell’ field of the Goal Seek pane.
Note: It is important to ensure that the cell reference entered under the ‘Set cell’ field is dependent on the reference entered under the ‘By changing cell’ field.
Once you know what you want to enter in the input settings of Goal Seek, you can continue with the following steps:
- Enter your required values in the ‘Set cell’, ‘To value’, and ‘By changing cell’ inputs.
- Click the “Solve” button.

- Google Sheets will do the required calculation and change the value in both cells B2 and D7 until it arrives at your target value in cell D7.
- On completion of the Goal Seek, you will get a notification informing you that the required Goal Seek is completed.


At this point, you can also scroll down to the bottom of the Goal Seek panel to see the “Solve Status”. Here you will find all the input values and other information of interest like Goal Seek start time, running time, etc.

Note: You can easily undo the change made by the Goal Seek app by pressing the CTRL+Z shortcut on your keyboard.
Final Thoughts on Goal Seek in Google Sheets
In this tutorial, I showed you how to use Goal Seek in Google sheets to perform powerful what-if analysis on your data. I showed you where to find the plugin, how to use it, and a few tips to make sure you get what you need. Overall, I’m delighted with the Goal Seek feature. I hope my examples and screenshots helped with your experience. If you have any questions on how to use Goal Seek in Google Sheets, please let me know in the comments!
Looking for more information on how to make the most of Google Sheets? I’ve got you covered. Check out my guide on how to create dependent drop downs, or browse some related articles for more information. I also have information for those who want to dive deeper into the full subject. Read up on my favorite Google Sheets courses to become a spreadsheet expert like me!