Google Sheets fill down can save you a lot of time when doing data entry or working with data.
To use the fill handle, Google Sheets recognizes a pattern and allows you to quickly use the pattern to fill down the data.
For example, suppose you have 1 in cell A1 and 2 in cell A2, you can simply drag the Fill handle, and it will fill the cells with the series of numbers (as shown below):
This Article Covers:
What Is the Google Sheets Fill Down Handle?
When you select a cell or a range of cells, you will notice a small blue box at the bottom right corner of the selection. This square is the fill handle in Google Sheets.
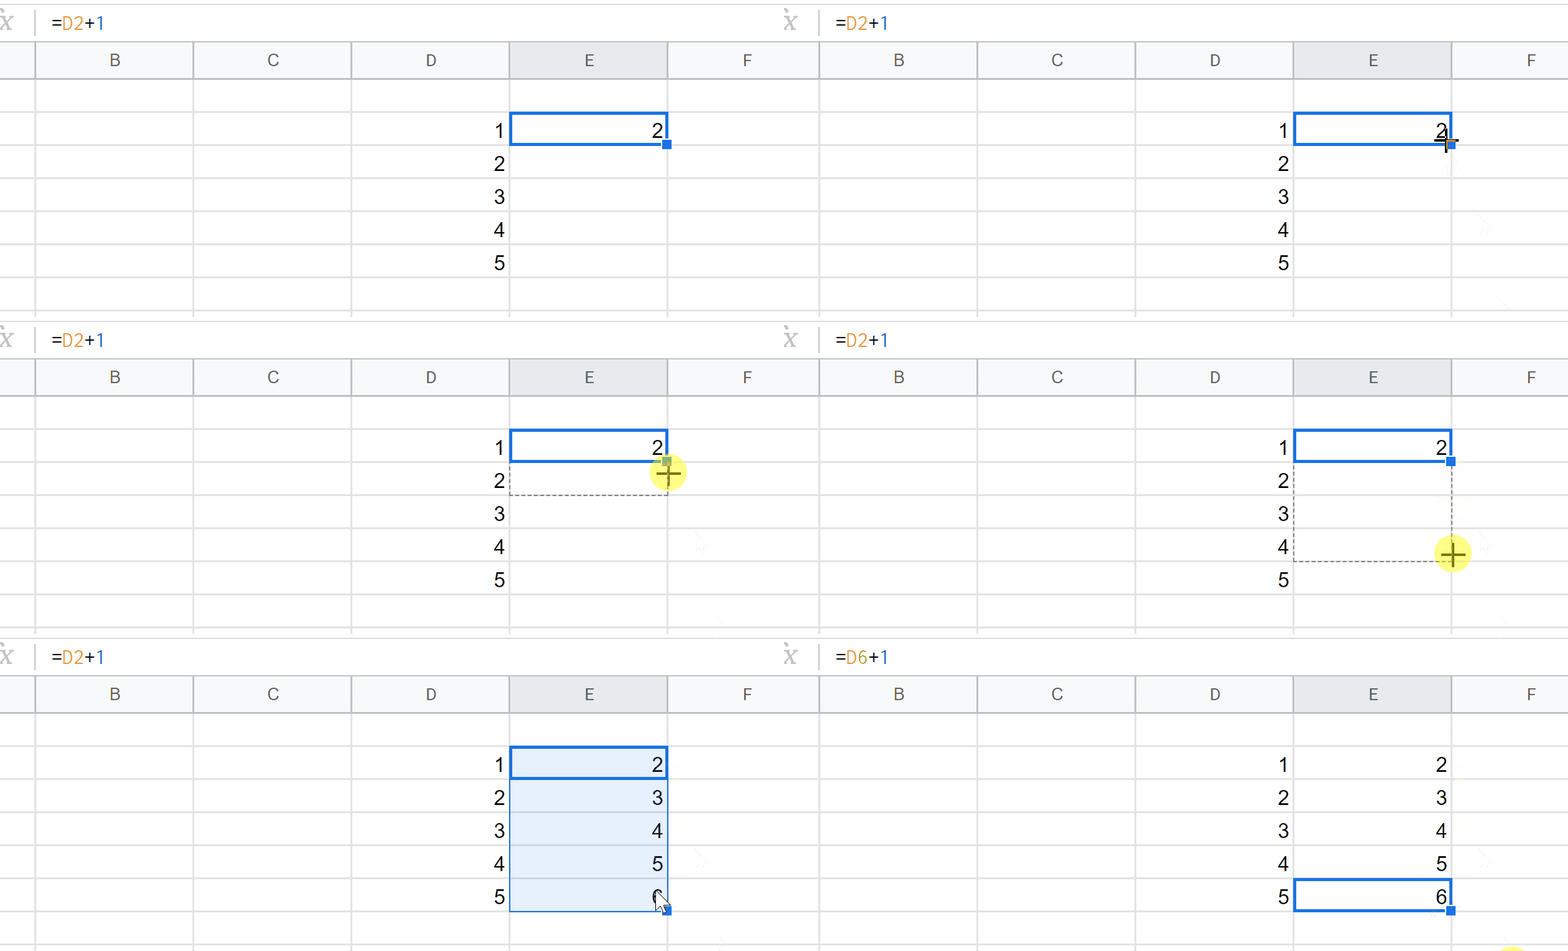
The fill handle is used to make Google Sheets drag down numbers to multiple cells. To use it, you need to hover your cursor over this blue square icon. When you do this, the cursor will change to a plus icon (as shown below):

Now you hold the left mouse button and drag it down. It will fill down the data to all the cells that till while dragging. You can also drag in horizontally to fill rows.
Examples of How to Use the Fill Handle in Google Sheets
The fill handle can help you speed up data entry.
Here are some of the instances where you can quickly fill down data using the fill handle.
Filling a Series of Data
In this example we will show you how to drag numbers in Google Sheets. As shown in one of the snapshots above, you can use the fill handle to fill down the data when there is a pattern.
For example, if you have 1 and 2 in two consecutive cells in a column, you can use the fill handle to get other numbers in the series (3,4,5 and so on).
Similarly, if you have a pattern where the number increments by .5 (as in 1, 1.5, 2), then you can get other numbers in this series by using the fill handle.
- Select the cell with the value.
- Move to the bottom right corner of the selection and click on the fill handle.
- Drag the fill handle down to the desired range.
Filling Data with Blank Rows
If you want to get the serial numbers with alternate blank rows, you can do that using the fill handle as shown below:
- Select the cell with the value and the next empty cell.
- Move to the bottom right corner of the selection and click on the fill handle.
- Drag the fill handle down the desired range.
Similarly, if you want the blank row after every two numbers, have the numbers in the first two cells, have the third cell blank, and select all three and drag the fill handle.
Google Spreadsheet Fill Down for Month Names
You can easily fill the month names in cells using the fill handle. All you need to specify is the month in the first two cells. This is needed as Google Sheets needs to understand the pattern.
- Write the first month in the first cell and the second one in the next cell.
- Select the two cells.
- Move to the bottom right corner of the selection and click on the fill handle.
- Drag the fill handle down to the desired range.
For example, if you want the names of the months, enter January in the first cell and February in the cell below it and fill down. Note that if you go beyond 12 cells, the months will repeat. So after December, it will start with January.
Note that this works as Google understands January and February as months. You can do the same with the shortened names of months such as Jan, Feb, and Mar.
You can also use the month name along with the year. Google Sheets will recognize it as a date and fill down accordingly. While in the case of month names, the names repeat after all the 12 months are covered, however, in the case of month name with the year, it will move on to the months in the next year (as shown below):
Note that after Dec 2018, it moves to Jan 2019.
How to Autofill in Google Sheets Without Dragging – Double Click
If you have data in a column, then you can also double-click on the fill handle to fill down. This lets Google Sheets fill down without dragging. It will fill the data up to the point where there is data in the adjacent column.
Below is an example where the month name is filled to 10 cell as there is data up to ten cells in the adjacent column.
Use Keyboard Shortcuts to Autofill in Google Sheets
You can also use the following shortcuts to autofill in Google Sheets:
- Ctrl + R to autofill to the right.
- Ctrl + D to autofill down.
- Ctrl + Enter to autofill a selection
How to Use the Google Sheet Autofill Formula
In the same way, you can also use this method for Google Sheets to fill a formula down. In the case of formulas, if relative references are used these will automatically adjust themselves (just like it does when you copy-paste data). As you can see, the formula in cell E6 stays relevant to the adjacent cell of D6.
How to Fill Down a Formula with ARRAYFORMULA Function
One other way to apply a formula to an entire column is by using the array formula, which also acts as a Google Sheet autofill formula.
This method requires you to wrap the initial formula with the array formula after adding it to your entire range of data. You only need to input this formula into a single cell. The moment you press Enter, the formula will return results in their entire column automatically.
You could also use an array formula that calculates the value based on the specified range automatically.

As you can see in the above example, once we specified the ranges in the spreadsheet, the ARRAYFORMULA automatically filled the adjacent column with the correct calculations.
In our sheet below, let’s say we want to find out the total amount of money made from the sale of each shoe.

Instead of multiplying the price and the number of shoes sold one by one, we can use the array formula in the following way:
- Type in the empty cell =ARRAYFORMULA or select it from the formula suggestion menu.

- Next is to select the range for the price.

- Type the * to multiply it by the range for the number of shoes sold.

- Press Enter, and the formula will apply to the entire range.

How to Configure Autofill
There are times when you might try either one of these Google Sheet autofill methods, but they don’t work. In this case, you might need to configure auto fill in Google Sheets. Here’s what you’ll need to do:
- Go to Tools > Autocomplete

- In the Autocomplete menu, click on Enable autocomplete and make sure it has a tick on it.

With this, you should be able to use the Google Sheets autofill formula functions.
Frequently Asked Questions
How Do You Autofill in Google Sheets Without Dragging?
The simplest method is to double-click the fill handle. Google Sheets is usually smart enough to figure out the cells you want to apply the values or formula to. You could also use an array formula that calculates the value based on the specified range automatically.
How Do I Turn On Autofill in Google Sheets? / How Do You Hide and Display the Fill Handle?
You can navigate to Tools > Auto complete to adjust the settings for autofill (like turning off suggestions), but you can’t turn it off completely.
What Is the Fill Handle in Sheets?
The fill handle is the small blue square in the right corner of a select cell or range of cells. You can pull this along other cells to automatically apply formulas or to predict your inputs.
Can I Use the Fill handle to Copy The Exact Same Data Over Cells?
Yes, the fill handle can be used to fill down Google Sheets columns with the same value. Usually, if there’s no pattern the fill handle has Google Sheets fill down the same value in the entire column.
If you fill two cell references with the exact same data, select them, then drag across the other cells with the fill handle it will automatically fill them with the same values.
Conclusion
In this article, we’ve shown you how to fill down in Google Sheets using the fill handle and how to use the array formula as a Google spreadsheet autofill formula. You can also learn more from our other articles about dependent drop lists and switch function.
Now That You’re Familiar With Google Sheets Fill Down, You May Also Like the Following Tutorials:


