Why do you group columns in Google Sheets? Grouping columns in Google Sheets is a great way to organize your spreadsheet and make it easier to navigate. You can do this by selecting your cells and then going to “View” > “Group” in the menu bar. This differs from merging cells because it allows you to expand and contract the grouped cells.
In this tutorial, I will show you how to group rows and columns in Google Sheets, expand and collapse groups, and ungroup a grouped set of columns or rows.
Read on to learn more.
This Article Covers:
How To Group Columns In Google Sheets
Using the View Menu
While you cannot group rows and columns simultaneously, you can group them individually using the following method, similar to adding columns. Here’s how to group cells in Google Sheets:
- Highlight the selected rows or columns you want to group, as seen in the screenshot below.

- Navigate to “View” > “Group” and click on the “Group” option.

- Select whether you want to group the rows or columns from the pop-up menu

Once you have selected your preferred grouping choice, a minus button will appear to the right, letting you expand and contract the group. You can even have Google Sheets group your data into multiple columns.

Using the Right-Click Menu
You can also group columns in Google Sheets using the right-click menu. However, this method only works if you select an entire row or column.
Here’s how it works:
- Select the columns or rows you want to group.
- Right-click on the selection to open the right-click menu.

- Scroll down and choose “View more column options.”

- Select “Group Column.”
This will group your entire column. After that, you can expand or collapse the grouped column using the minus button at the top.

Using a Keyboard Shortcut to Group Columns in Google Sheets
A quicker way to group columns in Google Sheets is by using the keyboard shortcut. Follow the steps below:
- Select the range you want to group.
- Press Alt + Shift + -> (right arrow key) on Windows or Option + Shift + -> on a Mac.
- Choose how you want to group the columns in the small pop-up menu.

This method works on all alternate browsers, such as Safari and Chrome.
Extended Guide: How to Group Columns in Google Sheets
This guide primarily covers grouping columns, but the method of grouping rows is the same as grouping columns in Google Sheets!
I will use the following sample dataset to demonstrate how to group in Google Sheets. As you can see, I have sales data displayed by month.

This dataset could be better organized and more accessible if I group the months into quarters. So, let me walk you through the steps below:
Organizing the Data
Before learning how to group columns in Google Sheets, it is a good idea to add columns to create divider columns for each quarter of the year. This will help you understand what each column group refers to when collapsed.
Here’s how to create the divider columns:
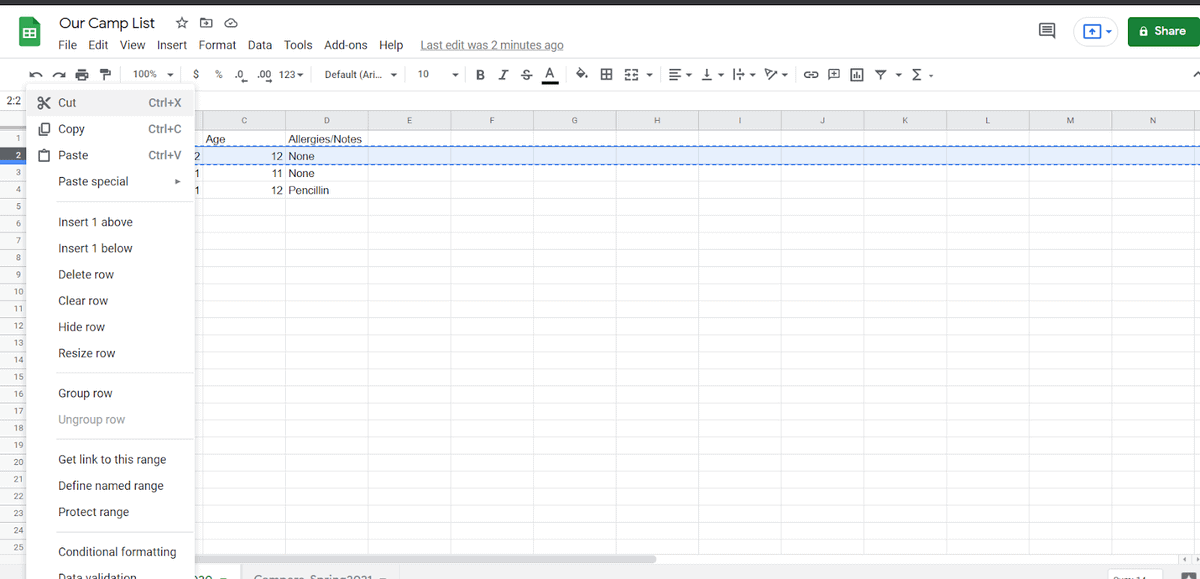
- Right-click on the column where you want to insert a new column.
- Click on the “Insert 1 column left option.”

Note: This is an optional step. I am showing it here to clarify the process. You don’t have to insert a column to make the grouping possible.
Your sheet will now look like the image below:

Group Columns in Google Sheets
Once your dataset is organized and ready, you can follow the steps below to group columns in Google Sheets according to the column value:
- Select the columns you want in a single group.
- In this case, I want to group columns C to E (for the months Jan, Feb and March). Therefore, I must select the entire range of columns C: E by selecting the column headers.

- Right-click on your selection and select “Group columns C-E” from the context menu that appears.

- This will group the columns C: E.
- You should see a minus icon (to collapse the row) at the column header to the group’s left.


- Repeat this process for columns G: I, K: M, and O: Q


The minus icon at the top of each group is accompanied by a line spanning the columns. This represents a part of the group, making it easier to see which columns come under the group.

NOTE: Remember you can also apply the same steps when grouping rows in Google Sheets.
Collapsing and Expanding Groups
Once your columns are grouped, Google Sheets can collapse the rows and columns with ease. Follow the steps below to learn how to collapse columns in Google Sheets:
- Click on the minus icon that appears on top of a column group.
- This hides the columns in its group, which you can expand by clicking the plus toggle (+).

2. If you want to expand the columns, click the plus icon (+). The grouped columns will once again become visible.

If your worksheet has multiple groups of columns, it might become tiresome to expand or collapse all of them.
In that case, I would expand all the groups by right-clicking on any plus icon (+) and then clicking on “Expand all column groups” from the context menu that appears.

Similarly, you can collapse all groups by right-clicking on any minus icon (-) for any group by clicking on “Collapse all column groups” from the context menu that appears.

How To Create Multiple Layers of Grouped Columns or Rows
In the above example, I grouped the columns based on just one layer (grouped months according to quarters). However, what if I further organize the quarters into years? For this, I can add another layer of grouping. Keep reading to learn how.
Once again, before starting to group the columns in this example, it is a good idea to create divider columns for each year, as shown in the image below.

Note: In the dataset, there is only data for one year, so grouping by year, in this case, would not be applicable. However, I have decided to go with just one year for simplicity and clarity of view.
Once your dataset is organized and ready, you can follow the steps below to add another layer of grouping to your columns, this time grouping the groups of quarters into a year:
- Expand all groups that you created before.

- Select all the columns (or groups of columns) you want to include in the new group.
- In my example, I selected columns C to R.

- In my example, I selected columns C to R.


- Right-click on any of the selected cells.
- Click on the “Group columns C-R” option from the context menu that appears.

- This will group the columns C: R.
- You will now have two grouping layers, which you can see on the gray stripe on top of all the column headers.

- You will now have two grouping layers, which you can see on the gray stripe on top of all the column headers.


- Repeat this process if you want to group other groups of columns, too.
Notice the gray area has a new minus icon on top of the previous layer of minus/plus icons:

This icon is accompanied by a line that spans over the columns that are part of its group, so it is easy to see which columns (or groups of columns) come under the group.
The first (or top-most) layer will be the larger group. When you collapse it, all the quarter’s columns will get hidden. The layers under this will be the sub-groups of columns.

You can further group and sub-group the columns as needed and see how all your columns have been grouped in the grey area on top.
Why Ungroup Rows and Columns In Google Sheets?
If you have grouped some rows and columns but you no longer need them grouped, you also have the option to ungroup rows and columns. This will allow you to see your full dataset without any restrictions. You will, of course, need to scroll through your specific data, which can be time-consuming when managing large datasets.
How To Ungroup Columns and Rows In Google Sheets
There may be times when you need to ungroup a set of grouped columns. In that case, follow the steps below:
- Right-click the plus /minus icon on the group you want to ungroup.
- Select the “Remove group” option from the context menu that appears.


If you want to ungroup multiple column groups (that are contiguous), then you can select the column headers for all the columns (in all your required groups). Then, follow the same steps as 1 and 2 above.
Frequently Asked Questions
Can a Google Spreadsheet Collapse Rows?
Yes. To collapse rows in Google Sheets:
- Select the rows by right-clicking on them
- Use the minus (-) sign to collapse.
Can You Group Columns in Google Sheets?
Yes. You can group columns in Google Sheets by highlighting the range you want to collapse. Then, click “View” > “Group.”
Why Use Grouped Rows and Columns in Google Sheets?
Since there is already an option to hide or unhide columns in Google Sheets, you might think, what’s the point of having a separate feature to group/ungroup sheets?
Both have more or less similar results. However, grouping in Google Sheets is useful because:
- You can use it to keep your data more organized and readable.
- You can group cells in Google Sheets at different levels. You can hide/unhide groups and sub-groups as required. Even after you accidentally close and have to reopen a tab.
- You can expand and contract parts of your worksheet so it looks neater.
Wrapping Up How to Group Columns in Google Sheets
This tutorial shows you how to group columns in Google Sheets. I also covered how to expand and collapse them and create multiple layers and levels of grouping for a more organized worksheet that is easy to navigate.
If you want to learn more about Google Sheets and all its functions, check out this online basic to advanced practical course that covers basic and advanced functions.
I hope you found this guide helpful. Please leave your comments below if you have any questions.
Read More: