If you’ve been wondering how to insert a signature in Word, there are a few ways to do it. Still, inserting a signature in Word is pretty straightforward. Read on to learn the four different ways.
This Article Covers:
Reasons to Add a Signature to Your Word Documents
You may want to add your signature to your Word documents for several reasons. These include:
- Authenticity: Adding a signature to your documents will be able to prove their authenticity to the readers. It will confirm who the signer is. This is especially true if the document is then exported to a non-editable document, as it will show that you are the original author of the file.
- Maintains Integrity: When you sign a document, it acts as a confirmation that the document was not tampered with by another party. This keeps the document safe from malicious actors that may try to change the contents of the document.
- Prevents Repudiation: For people communicating remotely, this can act as proof of the document’s origin to all the parties, which prevents unwanted disagreements.
Now, let’s look at how to make an e-signature on Word.
How to Add a Signature Line in Microsoft Word
A signature line offers a spot for you or another person to sign a printed document. The simplest approach to add a signature in Word to a document if you intend to print it is to add a signature line and sign it physically. We took the example screenshots on Word for Office 2019.
These are the steps you can follow to add a signature to a Word document:

- Open the Word document and choose the Insert option.
- Click on the Signature Line option. You can find this option in the Text section in the ribbon menu on the right side of the Word document.

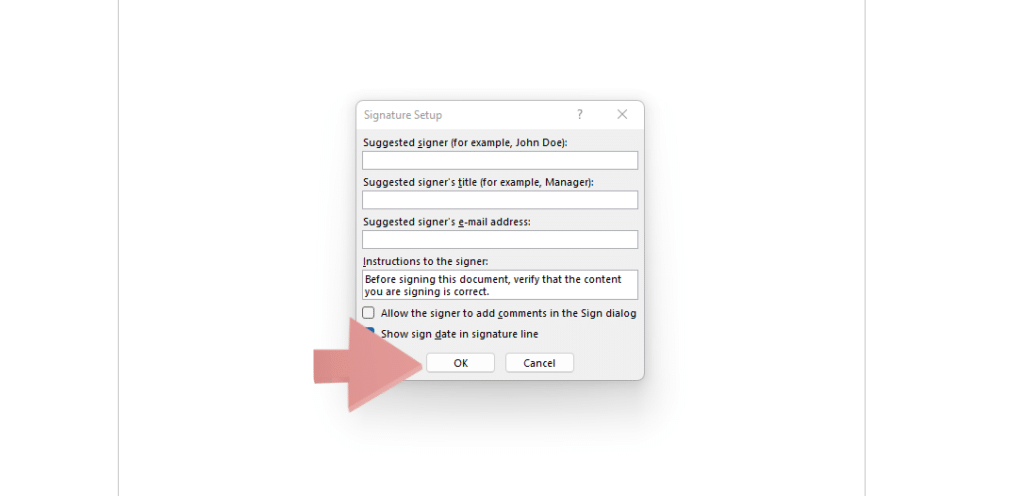
- A Signature Setup pop-up box will appear. You can write your signature details here, including the title, name, and the signer’s email address. The details can be of you or of the person you want to sign the document. Provide some instructions for the signer if you want to.
- To finalize, click on the OK option.
A signature line will be inserted with a cross sign and a line telling you where to put the Word signature. You can drag the signature line wherever you wish in the document. You can print out the document to sign manually, or you can save your document on your computer and add a digital signature in a Word document.
Related Reading: How to Add a Signature in Outlook
How to Add a Signature in Word Using a Picture
You’re one point ahead if you have a copy of your signature on your laptop or computer. You may simply and easily insert that image. After that, cut it or, if you’d like, insert some text under it, such as the title of your job, the current date, or mobile number.
Before you import the picture of the signature, write your signature on any page or piece of paper. Make sure the sign is visible and has blank space so you can adjust the signature later.
Ideally, you should have a black signature on a white background, as this will save you from having to make detailed adjustments.
To digitize your physical handwritten signature, take a photo of the signature on your phone or scan it on your computer.
Once you copy the signature onto your computer, you need to edit it. You can make the signature more readable by increasing its brightness and contrast. In doing so, the background will remain white, and the signature will reflect a solid color. The image’s background can also be selected and removed using some photo editing applications, though this is typically not required for a digital sign.
Here’s how to insert a signature in Word as an image:
- Take your mouse cursor to the point in the Word doc where you wish to put your signature.

- Click on the Insert option and choose the Pictures option.
- Then click on the This Device option. If you are using Mac, click on the Picture From File option.
- Now, browse and choose the image you wish to add to the document. Click on the Insert option.
If the signature doesn’t look perfect, you may want to crop it only to show the part you like. To do this:
- Click on the image you just pasted on the document and choose the Picture Format option from the pop-up ribbon on the menu.
- Click on the Crop option. You will see the edges of your image and drag and crop the part of the image that you wish to keep.
- Press Enter to save the changes.
How to Write Signature in Word
If you don’t already have a picture of the signature, you can draw one using your mouse or the touchpad by selecting the Draw tab in your Word document.
Here are the steps you can follow to insert a signature in Word using the Draw function:
- Put the mouse cursor where you wish to add your signature in the Word document.

- Choose the Insert option and click on the Shapes option.
- Choose the New Drawing Canvas option from the drop-down menu.

- A box will appear on the Word document. From the left side of the ribbon, choose the Scribble option. Use the touchpad or the mouse cursor to draw your signature in the box.
You can format your signature from the ribbon menu. You can also drag and place your signature wherever you want to insert a signature in MS Word.
When you’re done, you can drag the drawing canvas’ edges to change its size or position within the page. Similar to when you enter an image of your signature, you have the option of adding Words on the line beneath it.
You can also follow similar steps to the above to change an existing signature.
How to Add a Signature to Word Document on Mobile
There are a couple of solutions you can try on your mobile to insert a signature in Microsoft Word for mobile. You can use the underlining key or a single-cell table to add a signature line to your Word documents. You can also insert a picture of a real signature.
Let’s take a look at the steps you need to follow to add an image of your signature on Word for mobile:

- With your document open on the main screen, click on the Arrow (^) symbol at the bottom right corner of the screen.
- This will open a slide-up menu from the bottom of the screen, exposing you to more settings. There, click on the Home selection button on the main ribbon. Then click on the Insert option. This will show you a list of things you can add to the document.

- Here, select the Pictures option, which will allow you to insert the picture of the handwritten signature.
- Select the Photos option, and Word will take you to the local file selector on your phone.
- Click on the image of the sign, and the app will add it to the document.
However, you cannot add a digital signature to your Word or Excel files without downloading an add-in from a mobile device.
- Visit Add or remove a digital signature in the Office files for details on how to add a line with a digital signature to your Word or Excel document.
- Visit DocuSign for Word to learn more about the DocuSign add-in, which enables you to safely sign a document or email it to someone else for completion and signature.
Frequently Asked Questions
Can You Add a Signature in Word?
Yes, you can add one via a signature line, image, the draw tool, or an add-on.
Can You Add a Handwritten Signature in Word? / How Do I Write My Signature on a Word Document?
You can add a picture of your handwritten signature in your Word document. To do it, write your signature on a piece of paper. Scan it or take a picture of your signature on your computer. Open the Word document and choose the Insert option. There, click on the Pictures option, and from the pop-up tab, choose the image of your signature from your computer and click on the Insert option.
Where Is the Signature Line in Word?
A Word document won’t have a signature line in the document by default. However, you can easily add one by choosing the Insert option from the menu ribbon and then clicking on the Signature Line option from the right side. There, write your details and click on OK. Your signature line will appear in your Word document.
What Is the Best Font for a Signature?
The font you wish to use in your signature entirely depends on your preferences. However, most people prefer the authentic handwritten look for signatures. French Script MT, Lucida Handwriting, Mistral, and Segoe Script are some fonts that provide you with this.
Wrapping Up How to Insert a Signature in Word
After going through the above steps, you should now know how to insert a signature in Word, whether you want it to be typed, handwritten, or an image. But if you’re having any trouble, please let us know in the comments.