Spreadsheets these days are all about automating as many of your tasks as possible.
Imagine a scenario where you have to process an order, create an invoice, and then email the invoice to concerned parties while updating all necessary order details to a spreadsheet.
Believe it or not, it’s actually possible to do all this in one go and that too without using any custom application.
By using Google App Script, you can code the whole pipeline as part of your Google sheets and save it. The next time you need to process one or even hundreds of orders, all you need to do is run the script!
And you get all this without having to spend a penny on any invoice management software! Most importantly, you get to customize the process to do just your required tasks, so you have more control over the processing.
This Article Covers:
Sending a Single Email Using App Script in Google Sheets
Let’s start simple. Let us send an email message to just one person using App Script. So, let’s say you have a spreadsheet with just one email address in a cell, an email message in the next cell, and the subject in the third cell.
The syntax in App Script to send an email is just one line:
MailApp.sendEmail(emailAddress, subject, message);
where emailAddress, subject, and message can be replaced by references to the respective cells.
Here are the steps you need to follow if you want to use App Script to send an email to a designated address:
1. From the Tools menu, select Script Editor
2. You will find a template for a function already present. You can just start coding with this. Let’s rename this function as sendEmail. So, replace the word myFunction (which is the function name), with our new function name, sendEmail.

3. Inside the curly braces, we can define what this function is going to do. Type the following lines within the curly braces:
var ss = SpreadsheetApp.getActiveSpreadsheet()
var sheet1=ss.getSheetByName('Sheet1');
var emailAddress = sheet1.getRange(2,1).getValue();
var subject = sheet1.getRange(2,2).getValue();
var message = sheet1.getRange(2,3).getValue();
MailApp.sendEmail(emailAddress, subject, message);
In the first two lines, we are getting access to the spreadsheet named ‘Sheet1’ and storing a handle to it in a variable called sheet1. In lines 3, 4, and 5, we are creating three variables – emailAddress, subject, and message. Using the Sheet1’s getRange() function, we are assigning the value that is in the second row, the first column (cell A2) to the variable emailAddress. Similarly, the value in the second row, the second column (B2) is assigned to the variable subject and the value in the second-row third column (C2) is assigned to the variable message.
Finally, in line 6, we are using the MailApp.sendEmail() function to send an email to the intended email address, with the subject and message contained in the respective variables.
That’s it, your coding part is done.
4. Save your project by selecting File -> Save. Give it any name you like. We’re just going to go ahead and name it ‘sendEmail’. You can now run the code to see if there are any errors by pressing the 
a. Click Review Permissions.
b. You will then be given a warning that your App has not been recognized by Google and that you should proceed only if you know the author. Well, you’re the author, so you obviously don’t mind. Click on Advanced, then scroll down and click ‘Go to sendEmail’.
c. When you get the confirmation, just click Allow.
That’s it, you will find a small message on top of your Script Editor screen saying that your script is running.

Once the message goes, your code is done running.
If you check the inbox of the recipient email address, you will find an email message from your Gmail account, with the subject and message that you had in your Google Sheet cells.

5. Now, let’s add a button to automatically run our script. Insert drawing of a button or any image of your choice into a corner of your sheet:
Click on the button, select the three dots on the top right corner of it and select ‘Assign Script’. Then insert the name of your scripted function, which in our case is sendEmail:
Once this is done, you can simply click this image whenever you want to re-run your script
6. Now whenever you need to send an email, you only need to click this button.
Of course, this example was just to make it simpler for you to understand the basic coding strategy when sending emails using App Script. Obviously, this could have been easier if you had just sent the email directly from your Gmail account. But what if you want to send emails to a number of recipients, or only to those who satisfy certain conditions? That’s when App Script can turn out to be quite useful.
Sending a Single Email to Multiple addresses in Google Sheets
Now say you have an email list and you want to send the same message to all or some of them. For simplicity, we have just three addresses, but you can have more. We have the list of email addresses stored in Sheet1 and the email message in Sheet2.

Sheet1

Sheet2
Here’s the entire code that you need to type:
function sendEmail() {

var ss = SpreadsheetApp.getActiveSpreadsheet()
var sheet1=ss.getSheetByName('Sheet1');
var sheet2=ss.getSheetByName('Sheet2');
var subject = sheet2.getRange(2,1).getValue();;
var message = sheet2.getRange(2,2).getValue();
var n=sheet1.getLastRow();
for (var i = 2; i < n+1 ; i++ ) {
var emailAddress = sheet1.getRange(i,1).getValue();
MailApp.sendEmail(emailAddress, subject, message);
}

}
Let’s go through the above code line by line:
In the first three lines, we are getting access to both sheets and storing their handles in variables sheet1 and sheet2. Next, in lines 4 and 5, we are creating variables for the subject and message and assigning them their respective values. The subject is assigned the value in cell A2 of Sheet2 and the message is assigned the value in cell B2 of Sheet2.
Now for the main part of this code. In line 6, we used the getLastRow() function to obtain the number of rows (number of email addresses) in sheet1.
var n=sheet1.getLastRow();
Since the email address list starts from the second row onwards, the sheet actually contains n-1 email addresses.
Lines 7, 8, 9 and 10 comprise a for-loop.
The for-loop
A for-loop usually has the following general format:
for(<<initialization>>; <<condition>>; <<increment / decrement>>) {
<<set of statements>>
}
The loop takes a counter (for example, a variable, ‘i’) and keeps increasing it by a certain amount. As long as a <<condition>> is true, the loop will keep repeating the execution of statements within curly brackets.
Let’s understand the for-loop that we used in our code:
for (var i = 2; i < n+1 ; i++ ) {
var emailAddress = sheet1.getRange(i,1).getValue();
MailApp.sendEmail(emailAddress, subject, message);
}
Here, we used a variable ‘i’ as the counter. We first initialized it to 2, since the email addresses start from the second row onwards. Next, the condition (i < n+1) is checked. The condition is true, since i is 2 and n+1 is 4 (since there are just three email addresses in our sheet). Because this condition is true, the statements within curly brackets are executed.
First it gets the email address at cell (i,1). Since i = 2, the variable emailAddress holds the value in cell A2 of sheet1. The MailApp.sendEmail() function then sends an email to this address with the subject and message.
Once the statements in the curly brackets are executed, i is then incremented by 1 (i++). So now i = 3. Again, it is checked if the condition (i < n+1) is true. It’s still true, so the two statements:
var emailAddress = sheet1.getRange(i,1).getValue();
MailApp.sendEmail(emailAddress, subject, message);
are again executed. This time emailAddress holds the value in cell (3,1) or A3. Again the MailApp.sendEmail() function sends the message to this address and i is again incremented by 1.
This goes on until the condition i < n+1 is false. That means, as soon as i = 4, the condition becomes false and the looping stops.
When you run this code, you will find emails sent to all the addresses in your Sheet1.
Using an Email Template to Send to Emails to Multiple Recipients in Google Sheets
The above method is quite practical and really helps automate email sending when you have to send the same email to many people. However, instead of using the same email message it makes more sense to send messages that are a bit more customized. Most of the time it makes sense to have a template of an email ready and then customize the email according to its recipient.
Say you have a list of customer names, customer email addresses and items that they ordered. This is stored in Sheet1. You also have Sheet2, which contains a message template that needs to be customized with the corresponding recipient’s <name>and <item> ordered.

Sheet1

Sheet2
Here’s the entire code that you need to type:
function sendEmail() {

var ss = SpreadsheetApp.getActiveSpreadsheet()
var sheet1=ss.getSheetByName('Sheet1');
var sheet2=ss.getSheetByName('Sheet2');
var subject = sheet2.getRange(2,1).getValue();
var n=sheet1.getLastRow();
for (var i = 2; i < n+1 ; i++ ) {
var emailAddress = sheet1.getRange(i,2).getValue();
var name=sheet1.getRange(i,1).getValue();
var itemOrdered=sheet1.getRange(i,3).getValue();
var message = sheet2.getRange(2,2).getValue();

message=message.replace("<name>",name).replace("<item>",itemOrdered);
MailApp.sendEmail(emailAddress, subject, message);
}


}
Let’s go through the above code line by line.
The first five lines are quite clear by now. Let’s just take a look at what’s inside the for-loop. In lines 7, 8, and 9, we are acquiring the email address, name and item ordered, one row at a time:
var emailAddress = sheet1.getRange(i,2).getValue();
var name=sheet1.getRange(i,1).getValue();
var itemOrdered=sheet1.getRange(i,3).getValue();
In line 10, we acquire the message template and store it in a variable named message.
var message = sheet2.getRange(2,2).getValue();
Next, in the message template, we want to replace the words “<name>” with the current value in the name variable. We also want to replace the word “<item>” with the current value in the itemOrdered variable.
So, in line11, we use the replace() function twice to accomplish both these tasks. The result after the replacement is again stored back in the variable message.
message=message.replace("<name>",name).replace("<item>",itemOrdered);
Now that we have our emailAddress, subject and corresponding message, we just put them together in a MailApp.sendEmail() function and ship the email over to our target address. We do this over and over for each iteration of the for loop till we are done with all the email addresses in our list.
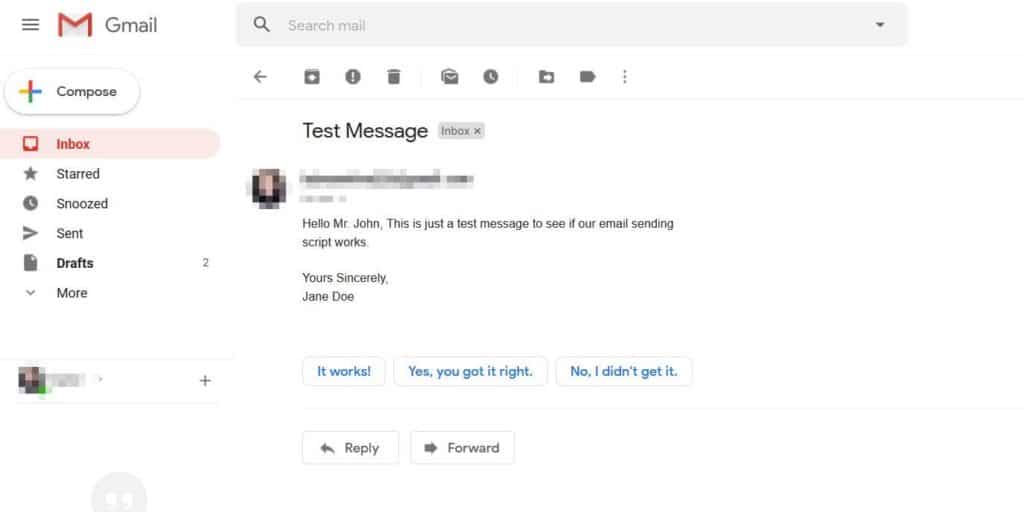
Here’s how one of our final emails looks.

Sending Different Email Messages to Multiple Recipients in Google Sheets
Finally, let’s look at a scenario where you want to send different emails to different email addresses.

This is quite simple. We just need to take cell values of each email message one by one inside the same for-loop, similar to how we took cell values for the email addresses and names. Here’s the full code:
function sendEmail() {

var ss = SpreadsheetApp.getActiveSpreadsheet()
var sheet1=ss.getSheetByName('Sheet1');
var n=sheet1.getLastRow();
for (var i = 2; i < n+1 ; i++ ) {
var emailAddress = sheet1.getRange(i,1).getValue();
var subject = sheet1.getRange(i,2).getValue();
var message = sheet1.getRange(i,3).getValue();
MailApp.sendEmail(emailAddress, subject, message);
}

}
Conclusion
In this article, we saw how to use an App Script to automatically send emails with the click of a button.
We saw how you can send the same email to multiple addresses as well as how you can send multiple customized emails to multiple addresses. We also saw how you can use an email template and customize it according to the recipient when sending the email.
We hope you found this tutorial helpful. We would love to get your feedback and suggestions in our comment section.
Hi everyone, i need help with some functions on google sheets;
The fact is this, i would write a code that send automatically to “n” mail address an allert when , in a cell, compare a specific value “x” (for example). I have tried some scripts without achieving any results. Anyone could help me?
Thanks.
Hi,
It was very useful. However, I got one point to add-on.
Is there a way to differentiate the emails to “To” and “Cc”, if I wanto to send the multiple email to different organisation puting “To” main person and copying other concerned.
Please let me know if any.
Thanks in advance
Deekshith K M
hi! i dont have knowledge in coding can any one help me. In my sheet i need to email requestors subject is found in column O and column A then in the body of email i will use column A and F. looks like this.
Re: [#]
Dear
Good day!
Your request has been received and is being queued for processing. Please wait for another email on the succeeding updates of Ticket Number
Thank you!
Your LIS Coor
I’m using google document to create a problem item. Someone needs to fill out a document form which result, after submit, in a new line in a linked google spreadsheet. Is it possible to use this new item as a trigger for executing this email function.
Thanks.
I figured out why it didn’t work–I needed the message within the counter brackets. I don’t know why I couldn’s see that earlier. Thank you–works great!
I thought I had this working a month ago, but this time, it used the person’s name from the first row for every email instead of progressing–it went through every row for the email address, and sent them out. I should have noticed in my testing, but I also didn’t realize it would send when I was debugging. Just thought it would check for code errors. Head slap!
function sendEmail() {
var ss = SpreadsheetApp.getActiveSpreadsheet()
var sheet1=ss.getSheetByName(‘Students’);
var sheet2=ss.getSheetByName(‘Email template’);
var subject = sheet2.getRange(2,1).getValue();
var message = sheet2.getRange(2,2).getValue();
var n=sheet1.getLastRow();
for (var i = 2; i < n+1 ; i++ ) {
var emailAddress = sheet1.getRange(i,5).getValue();
var first=sheet1.getRange(i,2).getValue();
message=message.replace("”,first);
MailApp.sendEmail(emailAddress, subject, message);
}
}
I used a version of this on 9/3 in testing and it worked fine.
Is there any way to just have the email written, but not send? In other words, have the button just open the email with all the information coded, but not send it? That way the sender can add some text to the body if needed? Thanks!
Very useful info! I’m in pursuit of how to have the script run automatically when a certain cell has a certain value.
Exact use case: I will be scanning codes to check in attendees to a meeting. these scans automatically go to my Google Sheet. I have Google sheets keeping track of the total attendees. I want this script to run when the cell containing the total attendees reaches a certain value, so that my staff scanning codes know the room capacity is met. How do I tell it to run a script automatically without clicking any button when a certain condition is met?
im doing the Using an Email Template to Send to Emails to Multiple Recipients in Google Sheets
is is saying Exception: Failed to send email: no recipient (line 11, file “Code”) how do i fix this?
my code
function sendEmail() {
var ss = SpreadsheetApp.getActiveSpreadsheet()
var sheet1=ss.getSheetByName(‘Sheet1’);
var sheet2=ss.getSheetByName(‘Sheet2’);
var subject = sheet2.getRange(2,1).getValue();;
var message = sheet2.getRange(2,2).getValue();
var n=sheet1.getLastRow();
for (var i = 2; i < n+1 ; i++ ) {
var emailAddress = sheet1.getRange(i,1).getValue();
MailApp.sendEmail(emailAddress, subject, message);
}
}
ty
it says on line 10 ”failed to send email: no recipient (line 14, file ”code”) hw do i fix this?
function sendEmail() {
var ss = SpreadsheetApp.getActiveSpreadsheet()
var sheet1=ss.getSheetByName(‘Sheet1’);
var n=sheet1.getLastRow();
for (var i = 2; i < n+1 ; i++ ) {
var emailAddress = sheet1.getRange(i,1).getValue();
var subject = sheet1.getRange(i,2).getValue();
var message = sheet1.getRange(i,3).getValue();
MailApp.sendEmail(emailAddress, subject, message);
}
}
Is there a way to get a confirmation that it was sent? Like adding syntax like:
state.setValue(‘SENT’).setBackground(‘#93c47d’);
info.setValue(‘Sent on ‘ + new Date());}
(note this doesn’t work by just adding – it says it not a function even if I add a state column)
Hi,
it’s working nice!
Is there an option to customize lettering (font type, size, boldings, etc.)?
Thanks,
Bianca
Hi Guys!
Awesome! I just want you to know that I am a non-techie retired senior citizen, but you taught me in one afternoon how to send personalized emails to a bunch of recipients! Now I need to implement this in real life, but I have a few questions for you before I tackle that.
1. We keep getting responses from Google Form into Google Sheet all the time. So is there a way to send out automatic replies by email instantly to each respondent without having to use the button? An auto-send feature, if you will.
2. If we HAVE to use the button all the time, the script would send out emails again to people who have already received one. So how would we send incremental emails only to new respondents?
3. Our Form generates about 50 fields for each response, and we’d like to send each of that back to the Respondent, along with the field’s Column Header, to make sure they have filled out the Form correctly. Is there a way to capture all the fields and their headers in the outgoing email, without having to code each of them individually? Something like a wildcard *.* or {{All Answers}}?
Once again, great job, and keep up the good work!
I look forward to your response!
I would be interested in knowing this as well.
You could update the script to write the emails send to another sheet(a history sheet if you will). Then update your script to check against the history sheet. That’s a quick and dirty workaround.
Dear Sone,
I am also trying learn this great feature. I shall be happy to learn about your first concern. You can check section 2 in the following link to resolve your 2nd issue.
https://developers.google.com/apps-script/articles/sending_emails
Thank you.
Rajnandan
I have the same question – was this answered?
Hello how can I send email without click running meaning automatically
For multiple Recipients, I am getting a syntax error on line 3
function sendEmail() {
var ss = SpreadsheetApp.getActiveSpreadsheet()
var sheet1=ss.getSheetByName(‘Sheet1’);
var sheet2=ss.getSheetByName(‘Sheet2’);
var subject = sheet2.getRange(2,1).getValue();;
var message = sheet2.getRange(2,2).getValue();
var n=sheet1.getLastRow();
for (var i = 2; i < n+1 ; i++ ) {
var emailAddress = sheet1.getRange(i,1).getValue();
MailApp.sendEmail(emailAddress, subject, message);
}
}
Great job!
Thanks a lot!
Hey!
Thanks for dropping this gem. Once I can get it to work it’ll save me a lot of work!
I am almost getting it to work (the third variant that is. Multiple recipients, slightly customized messages) but I’m getting the error ”failed to send email: no recipient (line 14, file ”code”)
This is my code:
function sendEmail() {
var ss=SpreadsheetApp.getActiveSpreadsheet()
var sheet1=ss.getSheetByName(‘Sheet1’);
var sheet2=ss.getSheetByName(‘Sheet2’);
var subject=sheet2.getRange(2,1) .getValue();
var n=sheet1.getLastRow();
for (var i = 2; i < n+1 ; i++ ) {
var emailAddress=sheet1.getRange(i,2).getValue();
var name=sheet1.getRange(i,1).getValue();
var feature=sheet1.getRange(i,3).getValue();
var message=sheet2.getRange(2,2).getValue();
message=message.replace("”,name).replace(“feature”,feature);
MailApp.sendEmail(emailAddress, subject, message);
}
}
Hope you can help me get this up and running.
Cheers!
@Jesse Abbey
Try replacing Line 14 with this below:
message=message.replace(“name”,name).replace(“feature”,feature);