I’ll show you how to convert text to date in Google Sheets. Without an understanding of the process, some users get frustrated. That’s why I include step-by-step instructions on how to convert text to dates.
Follow along with my full guide below. I cover DATEVALUE and TO_DATE functions, which are invaluable when you want to convert text to date in Google Sheets.
This Article Covers:
Why Convert Text to Dates?
We often find calculations involving dates that end up giving unexpected results. This usually happens when a value looks like a date but is actually interpreted as a text value by Google Sheets. And this needs to be addressed. It’s a fundamental part of sorting data. The issue usually involves sorting by date, performing calculations that involve dates, or relying on functions that need dates.
You might also come across this issue when you import data from external sources or convert a PDF file to Google Sheets. I cover that here, too.
In the past, I talked about how to convert text values to numbers. In this tutorial, I’ll show you how you can tell if a value is actually seen as TEXT or DATE and how to convert text values to date in Google Sheets.
How to Find out if a Date is actually a Text Value?
When you want to convert a string to dates in Google Sheets, you’ll need to know how the data in your cell is being interpreted. To do that, I recommend the ISDATE function. It will check to see if your cell’s data is already considered a date.
Here’s the rule: If the value is a date accepted by Google Sheets, the function returns TRUE. Otherwise, it returns FALSE.
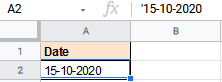
Let’s take a look at my first example. We have two cells that look like dates in this screenshot. See how A2 and A3 show October 15th?
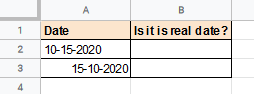
Google Sheets sees these as different. To understand if the cell A2 contains an actual date or just text values in disguise, type the following formula in a blank cell:
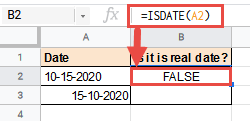
=ISDATE(A2)
The ISDATE function checks to see if the targeted cell contains a date. Since the date in cell A2 of our example is not accepted by Google Sheets as a date value, the function returns FALSE.
In this case, our data in the cell isn’t being considered a date.
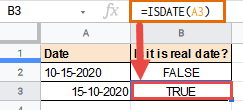
The same formula, if applied to cell A3, however, will return TRUE. Google Sheets considers this a valid date.
Want to check if a date is formatted correctly without using the ISDATE function? Here are a few other options. These tell you whether a date is actually a TEXT value:
- The contents of the cell aligned to the left (if the width of the cell is more than the width of its contents). A date value is always aligned to the right.
- In some cases, when you click on the cell, you will see a leading apostrophe to the date in the formula bar, signaling that it is a text value.
If the ISDATE function returns a False value, you’ll want to convert text to date format. Here’s how.
How to Convert Text to Date in Google Sheets
Once you’ve determined that the date is actually interpreted by Google Sheets as a text value, you can convert it to date.
The method to convert text to date depends on your situation. Here are some situations where a date might be interpreted as text in Google Sheets:
- A previous user might have worked on the sheet and saved the date values as text, either using the apostrophe (‘) before the date value or converting the date to plaintext format.
- Your dates might be entered in a format that is different from the date format accepted by your version of Google Sheets. Date formats understood by Google Sheets depends on the region and language setting. For example, you might have a date with the dd-mm-yyyy format, when Google Sheets only accepts dates with the format mm-dd-yyyy in your region or language setting.
- You might have imported a PDF into Google Sheets and found the dates to be in a weird text form, something like what’s shown below:

Let us take a look at all three of the above scenarios in three separate examples.
Using DATEVALUE and TO_DATE Function to Convert Text to Date in Google Sheets
First, let’s talk about DATEVALUE in Google Sheets. This function takes text and converts it into a date. As always, I’ll break down the syntax so we can understand what it does.
The syntax for the DATEVALUE function is as follows:
DATEVALUE(date_string)
Here, date_string is the date in TEXT format. The strings accepted by this function include any date that is normally auto-converted when entered, without quotation marks into a cell. The date also needs to be in a format that is understood by Google Sheets in your region and language settings.
We can use a combination of the DATEVALUE function and the TO_DATE function to convert a date that is originally in TEXT format to one that is in the Google Sheets DATE format.
The DATEVALUE function takes a date value in any valid format and returns the same date as a serial number.
Note: By default, all dates in Google Sheets are stored as an integer or serial number, which makes it easy to use them in calculations. Serial numbers start January 1, 1900, and increment by 1 for every day after that. So January 1, 1900 is serial “1”, the next day is serial “2”, and so on.
The TO_DATE function converts a given serial number to its corresponding date (in the Google Sheets DATE format). The syntax for the TO_DATE function is as follows:
TO_DATE(value)
Here, the value is the number to be converted to a date. It can be a numerical value or a reference to a cell containing the numerical value.
Let us take an example. Let’s say you have the following date:
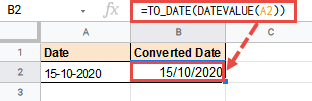
Notice there is a leading apostrophe, which means that this is a TEXT value. To convert this date in TEXT format to a proper DATE value, you need to use the TO_DATE function, along with the DATEVALUE function, as follows:
=TO_DATE(DATEVALUE(A2))
The DATEVALUE function will convert the text date to a number value, and the TO_DATE function will take this number and convert it back to an actual date, as shown in the image below:
Changing your Spreadsheet’s Location or Language Settings to Convert Text to Date
One common challenge in converting string to date in Google Sheets is troubleshooting location and language settings. Think about how dates are formatted differently in other parts of the world. That’s important when converting text to dates, too.
Here’s how to fix it.
If you think the issue might be the region or language settings for your Google Sheets, there are two options. You can either change your date to a format acceptable in your locale setting or change the spreadsheet’s location settings.
You can change the accepted date formats as follows:
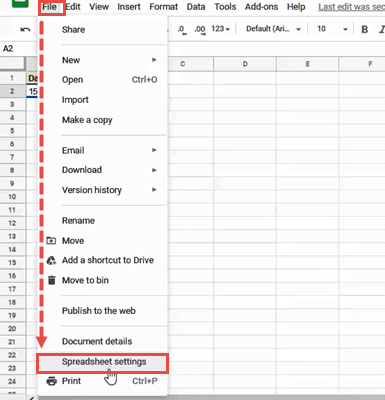
- Navigate to File->Spreadsheet Settings.

- Select the ‘General’ tab
- Under Locale and Time Zone, select your required setting.
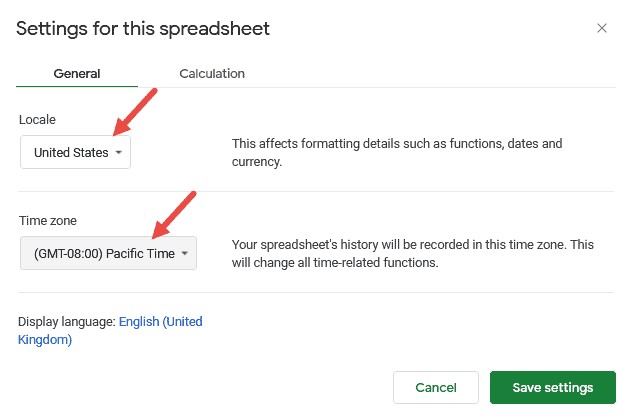
- Click Save Settings.
By setting the locale and time zone of your spreadsheet, you are changing the default currency, date and number formats.
Related: How to Use Phone Number Formatting in Google Sheets
Converting Text to Date when Date is in an 8-digit Number Format
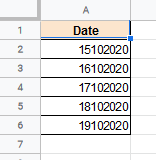
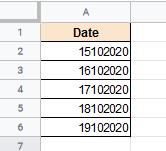
If your Google Sheet is imported from a PDF, it is not uncommon to find the dates formatted in a weird text form, like for example, an 8-digit number as shown below:
In such cases, the above two techniques will not work. You will need to extract the day, month and year from the given text date and feed them into the DATE function, to obtain a DATE value in a valid format: DATE(year, month, day)
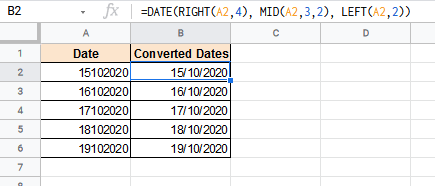
Here are the steps to convert the given 8-digit text date to an actual DATE value:
- Extract the year. This comprises the last 4 digits of the text date (which are to the right of the value). To do this, we use the RIGHT function as follows: RIGHT(A2,4)
- Extract the month. This comprises the 3rd and 4th digits of the text date (which are in the middle of the value). To do this, we use the MID function as follows: MID(A2,3,2). Here we are extracting 2 digits starting from the 3rd digit onwards.
- Extract the day. This comprises the first 2 digits of the text date (which are to the left of the value). To do this, we use the LEFT function as follows: LEFT(A2,2)
- Finally, combine these together into the DATE function, to create a DATE value with the extracted day, month, and year values.
So the final formula will be:
=DATE(RIGHT(A2,4), MID(A2,3,2), LEFT(A2,2))
This should produce the date in the correct format as shown below:
It’s important to note that not all text dates are imported in exactly this format. The order of the day, month, and year might vary from case to case.
The trick is to effectively use the RIGHT, LEFT, and MID functions to extract the right numbers to represent day, month, and year.
Following are some more possible text date formats, along with the corresponding formula that can be used in each case, to convert them to actual dates:

Notice in the last formula of the above screenshot, the year value in the original text date contains just 2 digits (instead of 4).
So to get the year 2020 we concatenated 20 with the year value by using the formula: 20&RIGHT(A4,2). If we don’t do this, Google sheets will return the value 1920 for the year instead of 2020.
In this way, you can convert dates put in any format by effectively extracting the day, month, and year values and passing them through the date function.
Final Thoughts on Converting Text to Dates
In this tutorial, I showed you three cases where you might find dates represented as TEXT in Google sheets. I included real-world examples with screenshots, so you can follow along as I complete each conversion. I also included troubleshooting tips. Most importantly, I showed you how to convert these TEXT values to actual DATE values.
Looking for more spreadsheet expertise? I regularly share Google Sheets templates with full step-by-step breakdowns on how to increase your productivity.